Online shopping provides a quick and convenient way to purchase products, and this is especially true for the...
Crutch Pads & Cushions | Armpit & Hand Grips
Quality replacement Crutch Pads, also referred to as Crutch Cushions or Crutch Pillows, are essential for maintaining hand and armpit comfort with extended use of wooden or aluminum walking crutches. Worn-out crutch pads are not only uncomfortable, but they can lead to chafing, rashes, blisters, and calluses. Replacing torn or hardened foam pads are also essential to keeping a safe, slip-resistant surface.
Vitality Medical carries a wide varie
Crutch Padding Options for Walking Arm Crutches
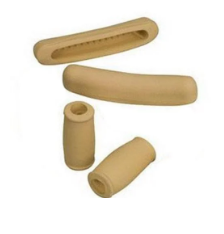
Foam Pads
This is the most common crutch padding material due to its affordable cushioning properties. A drawback to foam is it can harden over time, but it is cheap and easy to replace. The foam material is skin-friendly and latex-free.
Examples:
- HealthSmart Crutch Pad Accessory Kit, 512-1430-0000, comes with a complete kit of underarm pads and handgrips to replace all pads at once.
- Carex Split Crutch Handgrips, A95100, has a split design to apply directly over the bar instead of sliding it on.
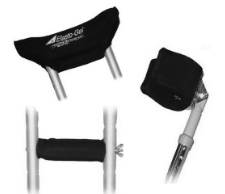
Gel
This soft glycerin gel material is an alternative replacement pad material that is both comfortable and wears well with intense use. Gel pads are more expensive than foam pads, but they won't disintegrate or create hard spots over time.
Example:
- SWT Crutch Mate Crutch Pads, CRPD30, create soft and pliable cushioning without causing friction or compromising the skin.
How to Replace Crutch Pads
- Remove the handle by unbolting both sides.
- Remove the foam pad by pulling it down off of the handlebar or pierce a hole to tear it off.
- Slide the new one onto the bar and twist it into position.
- The armpit pad is easier to replace since there are no anchoring bolts. The molded inserts hold it into place. Lift one side at a time.
- Place the new pad over the top and stretch the opposing side over the top until it molds into place.
Related Categories
Inspired by your history...

@Recommendation.StarRating
@Recommendation.Gender
Login and Registration Form