
Quick Summary:
Cleaning and storing tracheostomy equipment properly helps prevent respiratory infections and complications. This blog goes over tips and routines you can use to properly manage your equipment.
Click a link to jump to a section.
Introduction
A tracheostomy is a lifesaving procedure that allows air to pass through the windpipe when normal breathing would otherwise be blocked or reduced. Good and consistent equipment hygiene is essential for preventing complications, discomfort, and infections in the tracheostomy site, bronchial tubes, and lungs.
NOTE: This information is provided for general informational purposes only and should not be considered professional medical advice. Please consult with your healthcare provider for specific advice on safe tracheostomy care.
1. Gather Supplies Before Cleaning
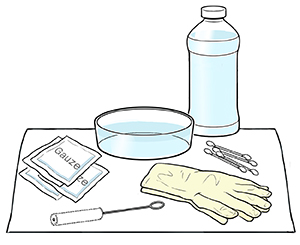
Choose a clean, well-lit, and ventilated space near a sink. Collect your supplies on a clean surface.
Common Cleaning Tools for Tracheostomy:
- Warm water
- Bowl of cleaning solution (mild soap or hydrogen peroxide, as recommended by your doctor)
- Trach brushes or pipe cleaners
- Gloves
- Gauze
- Clean towel
2. Daily Cleaning Routine
Your trach equipment usually needs daily cleaning or replacement. Use the following tips as a guide for cleaning and maintaining your home care supplies (NOTE: Do not try to reuse disposable supplies - they should be disposed of after use).
Suction Catheter
- If you use a new catheter every time you suction, after removing the used catheter, rinse it out, place it in a sealed plastic bag, and dispose of it properly.
- For reusable catheters, flush the catheter with water and moisturizer-free, colorless dish detergent after every use. Rinse with plain tap or sterile water.
- Dry the catheter exterior with a clean, lint-free cloth. Attach the catheter to the suction machine and turn it on to thoroughly dry the catheter. Once done, wrap it in a lint-free cloth and leave it in a clean, safe place for its next use.
Suction Machine
- Clean the machine, tubing, and containers daily.
- Empty and rinse the suction container with cool water.
- Wash the suction container with clear, moisturizer-free dish detergent to remove mucus residue.
- Rinse with hot water and wipe down with a dry, clean cloth.
- The suction machine most likely contains a filter that needs regular cleaning. Follow the manufacturer's guidelines for disinfecting the filter and the machine itself.
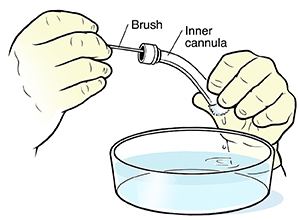
Reusable Inner Cannula
- The inner cannula should be cleaned two to three times per day, or more as needed.
- Wash your hands.
- Using a small bowl, fill it with equal parts water and hydrogen peroxide. Place the inner cannula into your peroxide solution.
- With a trach brush or pipe cleaner, gently wash away any mucus or debris.
- Wash as many times as needed so the cannula is visibly clean and free of any residue. If the peroxide solution becomes too dirty after several washes, prepare a new batch and clean the cannula again.
- Thoroughly rinse the cannula with cool running water and inspect it carefully to ensure all residue is removed.
- Use a dry brush or pipe cleaner to remove any excess moisture or wetness from the cannula before reinserting it.
Tracheostomy Tube, Obturator, and Ties
- Fill a clean container with tap water and mild soap, or hydrogen peroxide (DO NOT use hydrogen peroxide on sterling silver).
- Soak the trach tube, obturator, and ties in the cleaning solution. Let it soak for a few minutes to loosen excess mucus and debris.
- Clean the tubes and other parts using gauze sponges or pipe cleaners. Use pipe cleaners to clean the interior of the tube.
- Rinse thoroughly with clean tap water to remove all soap or hydrogen peroxide residue.
3. Dry and Inspect
Allow all parts and tubes to air-dry on a clean, lint-free towel, away from direct sunlight. When setting parts aside to dry, it's a good idea to check for any signs of wear. If you find any signs of damage in any part, especially trach tubing, it needs to be replaced. Most trach equipment should be left to dry for two to three hours before using again (ask your doctor for more specific recommendations).
4. Proper Storage Techniques
Always keep spare parts available for replacements or while waiting for parts to air dry. Whether in storage or air drying, parts should be kept in a cool, dry, dust-free area. For parts on regular rotation, like cannulas and tubing, it can help to store parts in labeled containers or bags, with the clean date marked. Labeling tracheostomy supplies can help you identify at a glance clean vs. used equipment storage.
5. When to Replace Components
If you find any signs of damage on any tracheostomy parts, they should be replaced as soon as possible. Even reusable parts in good condition need to be replaced eventually - speak with your healthcare provider on the recommended frequency of changing trach tubes, cannulas, and more. A consistent tubing replacement schedule is a key part of maintaining your tracheostomy and helps reduce the risk of infection.
Signs of worn trach parts include:
- Cracks
- Discoloration
- Bad odors
Conclusion
Improper or inconsistent care of tracheostomy equipment can lead to life-threatening infections or situations because of clogged tubes, contamination, and more. Maintaining a consistent cleaning routine and storing equipment in a safe, clean area can make all the difference in preventing complications and respiratory infections. Regular care not only protects you, but also protects the longevity of your equipment.
References
- 1 "UPMC. (2007)." Tracheostomy Care Pittsburgh; University of Pittsburgh Medical Center.
- 2 "University of Iowa Health Care. (2024, November)." How to clean a tracheostomy tube.
- 3 "Saint Luke’s Health System." Cleaning your tracheostomy. Saint Luke's.


Login and Registration Form